Disney-Inspired Halloween Costume Round-Up

A few years ago, I posted a roundup of Halloween costumes from my past, but it’s been awhile since I last talked about costumes. As we head into the 2018 Halloween season, here’s a mini-roundup of some Disney-inspired costumes that I’ve crafted in recent years for Mickey’s Not-So-Scary Halloween Party at Magic Kingdom Park!

2015: Wilderness Explorer (from the Disney-Pixar film Up)

I’d been wanting to run with this costume idea for some years when I finally decided to go for it. It seemed fairly simple to pull off and I loved all of the small crafty details that went along with it.

IMG_1259

  • Khaki Shorts: I already owned these!
  • Shoes: I didn’t have hiking books, but I already owned these brown Sketchers. I added orange laces.
  • Hat: The cheapest solid-yellow version I could find in an eBay store.
  • T-shirt: Plain, solid-yellow from a craft store.
  • Wilderness explorer logos and flag: Crafted from felt and glue, using an image I found on the internet as a template. Flag also required a wooden dowel and bead.
  • Sash: Sewn from solid brown broadcloth. I freehanded a pattern on paper using my real-life Brownie Girl Scouts sash as a guide (LOL).
  • Neckerchief: Solid orange broadcloth, I sewed the edges just to finish it off, and then used a wooden napkin ring (craft store) to secure it.
  • Badges: I printed images from the internet, cut them out and decoupaged them to small wooden discs. I used hot glue to secure the badges to the sash.
  • Weird Wilderness Explorer pin with beads: I don’t really know what this thing is, but I crafted it using a small square mirror painted brown, and some wooden craft beads, then taped a safety pin to the back.
  • Grape Soda pin: A Disney Parks merchandise purchase.

I had a lot of fun crafting this one, and it was a really comfortable costume, which is important when you’re wearing it to a theme park! The sash with badges did tend to sag a bit from the weight of the badges, so I had to keep adjusting it throughout the night, and the sewing badge fell off within five minutes of me arriving at the party (it HAD to be the sewing badge, right!?) – but other than those small challenges, I’d consider this costume a win!

2016: Fix-It Felix (from the Disney film Wreck It Ralph

This is another costume I’d had in mind for a few years, but I held back, thinking that it was better served as a group costume, and I didn’t know anyone who was willing to be my Ralph or Vanellope. But I finally decided I didn’t want to wait around for someone to be part of my group, and I moved full speed ahead with my dreams of being Fix-It Felix.

IMG_1260

  • Navy Shorts: I already owned these! I would have worn jeans if it had been cold outside.
  • Shirt: Purchased from the boys section at Walmart. I ordered an iron-on patch with my name from Etsy.
  • Hat: I already owned this hat, but created a “Fix-It Felix” logo from felt and lightly basted it over the existing logo on the hat.
  • Belt: A stretchy fashion belt from Walmart. I folded it and sewed a straight line from top to bottom to form a “loop” on one hip to store my gold hammer.
  • Hammer: I found a plain wooden hammer toy on Etsy, then spray painted it gold.
  • Shoes: I struggled with the shoes for this costume because I knew they were a distinctive part of Felix’s overall look, but real work boots are expensive. I really didn’t want to get expensive shoes just for a Halloween costume. I ended up finding these shoes in the boys department at Walmart, which give the appearance of work boots without being so expensive (since they’re squishy and don’t actually have steel in the toe). And although wearing kids’ shoes would normally be a stretch, they were super roomy inside and fit me just fine because of the style. Yay!

I’m so glad I decided to move forward with my Fix-It Felix dreams, even without anyone to be my Wreck It Ralph sidekick(s). One unexpected highlight of the night was running into other Ralph/Felix/Vanellopes throughout the park. They were more than willing to take a photo with me to complete my look!

2017: Mary Poppins 

My Mary Poppins inspiration started with a black skirt that I already own and regularly wear to work. A good black skirt seemed like one of the more important staples for a Mary Poppins costume, based on some Pinterest ideas I’d seen, so I decided to run with it.

image9

  • Blouse: Purchased from Amazon after searching for various options like “victorian blouse” and “lacy blouse.” I chose this one because it was sleeveless, which is perfect for a Florida Halloween party.
  • Belt: Not actually a belt, but just a red ribbon from my craft room that gives the appearance of a belt.
  • Hat: A black straw hat from Amazon. I accessorized it by using hot glue to attach some flowers I already had in my craft room, leftover from a wreath project.
  • Bow tie: I sewed this using solid red broadcloth I already had in my fabric collection.
  • Carpet bag: A super lucky find at Goodwill for just $2!
  • Parrot head umbrella: The craftiest part of my costume! I really wasn’t sure how I would approach the making of this umbrella, but I love the way it turned out. I molded a parrot out of Crayola Model Magic clay (that stuff is SO fun and SO amazing!) onto the handle of a cheap, black umbrella from Walmart. I used some of my craft paints to paint the parrot, and sealed it with a clear sealing spray. The Crayola Model Magic was the GREATEST decision since it was so versatile and most importantly, lightweight. I can see why the Cosplay community loves it so much.

So there you have it – the last three year’s worth of Halloween costumes. You’re probably wondering what I have up my sleeve for 2018. Keep an eye on my Instagram account for a reveal in just a few weeks!

Happy (almost) Halloween!
img_0981


#SewMyStash2015: Harvest June (Fail)

When I started this blog, I promised I’d share the failures in addition to the successes. So here you go. A fail!

Well, in my defense, it’s not really a sewing fail. It’s just an unfinished project. So, a failed timeline. Rarr.

The #SewMyStash2015 challenge proposed by Leasa for June was called “Harvest June” and we were tasked with making something fall-related. I was pretty excited about it because I’m always behind when it comes to sewing for holidays. How exciting would it be to have a fall-related item completely ready-to-go in the fall because I had already completed it in June?

5

Proactive crafting!

But, excuses excuses: dealing with all this moving nonsense in the past month or so has really put me behind. I’ve spent a lot of time getting the new house in order (or, attempting to – I still have so much work ahead) and sadly, getting the craft room in order has not been at the top of priority list. Boo.

Continue reading

Paper piecing time machine

This fall/winter, I haven’t been that great about updating the blog – yikes. But just because my blog has been stagnant doesn’t mean my crafting has. I’ve been doing lots of things behind the scenes, just haven’t taken the time to write about them. Or I can’t, because I’m in Christmas elf mode and everything is a secret!

So hang in there while I jump in my sewing time machine and show you a project I tackled that has a Jack O Lantern on it. Yes, a Jack O Lantern. I told you I was jumping in a time machine, stop judging! 😉

Even though Halloween is over, I want to rewind a little bit and highlight this little experimental project I tackled earlier in the fall. I took my first shot at foundation paper piecing a quilt block! In my quest to follow crafty social media accounts, I’ve found a lot of quilt-y friends who frequently post about paper piecing. Needless to say, their constant paper piecing posts (can you say “paper piecing posts” ten times fast?) piqued my curiosity and I decided to give it a try around Halloween with this pumpkin paper piecing (free PDF pattern available here).

Untitled-1

Continue reading

DIY Halloween Costume: Remy from Ratatouille

October is a great month for lots of reasons, but one reason I really love October is that it’s Halloween costume season! I have great memories of flipping through the pattern catalogs in the fabric store and looking at all of the costume options throughout my youth. I don’t dress up every year, but I really enjoy pulling costume ideas together whenever I do.

The great thing about living in Central Florida is there’s always a Halloween party in town, given the number of Halloween themed events in the surrounding theme parks. Over the years, I’ve had a bunch of magical Halloween costumes:  Wendy Darling from Peter Pan, Boo from Monsters, Inc, a Mouseketeer and Tinker Bell. But one of the most fun costumes I put together was Remy from the movie Ratatouille!

The Ratatouille costume was a lot of fun and incredibly simple to put together at the last minute. It also forced me to learn how to spell “Ratatouille” from all the Googling I did while putting the costume together. 😉

Here’s a breakdown of my quick and easy DIY Remy if you’re looking for a last-minute costume!Remy

What you need:

  • Gray clothing items of your choice
  • Pink shoes
  • Pink gloves
  • Pink craft foam cut into a teardrop shape + chef’s hat (I used hair clips to secure the ears to the hat)

Optional:

  • Eiffel Tower on a Stick – print on computer paper, glue to poster board and attach a ruler or wooden dowel to the back. Instant Eiffel Tower on a Stick! I have to say — this was the most fun part of the costume. It made a great photo prop.
  • Recipe cards with a recipe for Ratatouille printed on them — these were fun to hand out to anyone who recognized us.
  • Linguini: No, not the pasta, the gangly chef from the movie! Find a friend who is willing to complete your Pixar duo, throw in some red hairspray, a chef’s hat and chef’s jacket (we got ours from eBay) and you’ve got yourself a Linguini.
  • A replica of the cookbook, “Anyone Can Cook!” I recreated one using a paper mache book from Joann Fabrics, craft paint and some graphics I printed from the internet. The book/box was a great place to store the recipe cards.
Anyone Can Cook

The cookbook from the movie alongside my paper mache version!

So there you have it… DIY Remy and Linguini!

Remy & Linguine Ratatouille costumes

My Linguini looks a lot like Nick Lachey.

What’s on your costume agenda this year? I’d love to hear your quick and easy DIY ideas!

Fun Fact… today they were serving ratatouille in my company cafeteria. I wrote this blog post some time ago, but had scheduled it to post today. And then… ratatouille for lunch. I wish I had taken a photo. I can’t make this stuff up. It’s magic!

LindsaySignature


Ninety-Nine!

Guess what? This is my 99th blog post, with my 100th just around the corner! It’s taken me a pretty long time to get here, considering my first post was on October 19, 2010. But my last-minute decision to go to grad school in 2011 meant my blog took a really, really long break and I’ve recently hopped back on the sewing train. Celebrate!

In my next post, I’m going to announce a cool new idea I have up my sleeve in honor of the 100th post. But for number ninety-nine, I thought it would be fun to dig into the archives and highlight some of my previous projects – including some that were never even mentioned in my blog. This is just as exciting as getting the DVD and watching the extra scenes that were cut out of the movie, right!?

Continue reading

Ghosts of Halloweens past!

Happy Halloween!

This is the first year in many that I haven’t prepared a Halloween costume. While I don’t have access to photos from every single Halloween I’ve ever celebrated, here’s a sampling of some of the “ghosts” of my Halloweens past!

Pre-school Years: A repurposed dance recital ensemble turned Tooth Fairy costume. Yes, Tooth Fairy. See the tinfoil wand that says “Tooth Fairy” at the top? What can I say? I come from a family of dentists, and I was easily impressionable.

Tooth Fairy Costume

Kind of a sad little Tooth Fairy…

More pre-school years: I’m a store-bought bunny, and my brother is a skeleton. My mom made the skeleton costume herself by tediously cutting white felt into bone shapes and sewing them onto black sweats. My mom is awesome!

Bunny & Skeleton Costumes

Kind of a sad little bunny… why was I always so sad!?

1990: I’m a non-politically-correct Native American. One of my favorite costumes, despite the fact that a boy in my class was also a non-politically-correct Native American that year, and everyone said we were going to get married, which is a traumatizing statement in the first grade.

Native American Costume

So excited to bring my non-politically-correct Native American baby doll to school!

1992: I was a “50’s girl” complete with a poodle skirt and a silky pink jacket from the Mirage in Las Vegas… because every girl from the 1950’s had a Vegas jacket. LOL!

1950's Girl Costume

Why were there poodles on skirts back then, anyway?

1994: I was a mime. Not pictured, as it was one of my most embarrassing costumes. However, if you ask my mom, it was one of her favorites and she’ll show you pictures. So don’t ask my mom.

mime

Don’t ever let your mom talk you into being a mime.

With the exception of freshman year (when I didn’t know any better and wore a Dorothy costume to school), I didn’t dress up in high school. I went to a Catholic school with a strict dress code and there were just too many restrictions to even bother. Back then, we were just happy if we were allowed to wear blue jeans. And I didn’t dress up in college because I consider myself a person who values dressing tastefully and appropriately, and dressing up isn’t an option in college if you dress appropriately.

After college, I moved to central Florida and started spending a lot of time at Walt Disney World… after a long hiatus of no Halloween costumes to my name, I was excited to jump back in to the wonderful world of Halloween – especially in a place where awesome, appropriate costumes are valued. All of the sudden, Halloween was fun again!

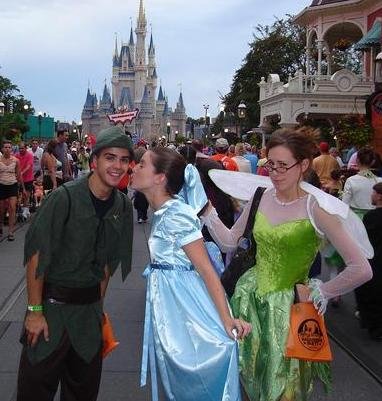
2006: I was determined to dress up as my favorite Disney character, Wendy Darling, and ordered a handmade Wendy costume from Kelly’s Costumes. I wore it to Mickey’s Not-So-Scary Halloween Party with some friends who dressed up as Peter Pan and Tinker Bell!

Peter Pan, Wendy and Tinker Bell costumes

What’s a kiss?

2007: Because I just couldn’t get enough – Wendy returned.

Wendy & Peter Pan Costumes

Sometimes Peter gets mistaken for Robin Hood… what’s your vote?

2008: I debuted TWO costumes in 2008 for two separate parties! One Tinker Bell costume, complete with light-up fairy wings and – my favorite – poof ball shoes. I was so adamant that the shoes be exactly the way I pictured them that I made them myself – celery green Prima Crocs with a poofball sewn on top.

Tinker Bell Costume

Perfect poof-ball shoes!

And one Mouseketeer ensemble, easily created with a white t-shirt, iron-on letters and a custom set of Mickey Mouse ears.

Mouseketeer Costume

Y? Because we like you!

2009: Two chefs hats, a chef jacket, some red hair dye and an “Eiffel-tower-on-a-stick” created the perfect Remy and Linguine costumes from the movie Ratatouille. I wore all gray and pinned craft-foam rat ears to my chef hat. I also decoupage’d that pretty fab version of the cookbook from the movie!

Remy & Linguine Ratatouille costumes

Can you believe I was lucky enough to go to the Halloween party with Nick Lachey?

That brings us to last year, which was the first year I sewed a Halloween costume! I dressed up as Boo, and I sewed this gigundo Mike Wazowski costume!

Boo & Mike Wazowski Monsters Inc Costume

Nick Lachey loves Mike Wazowski!

So why no costume this year? Well, at the risk of sounding like I’m full of excuses, I’ve just been too busy with school, and dressing up as an MBA student is kind of boring.

Woman Studying

Not the coolest costume in the world.

But in a dream world, this is what I really would have liked to be this year… maybe this is something I can sew for next year? If I get started… now… I might just finish in time… 🙂

Giselle's Blue Dress from Enchanted

Giselle’s blue “curtain dress” from Enchanted! Dreamy!

Any fun Halloween costumes in your world this year?

The most magical workroom on earth!

An avid follower of the Disney Parks blog, I recently stumbled across this video in which a Cast Member from Walt Disney Parks & Resorts Creative Costuming shows viewers how to put together a quick no-sew pirate costume for Halloween. While the costume is nice, I’m more interested in the amazing workroom, located at Disney’s Hollywood Studios. Doesn’t it look amazing?

This is the first year in many that I will not be able to put together a new Halloween costume, which means I’ll be pulling a previous year’s costume from my closet!

Does anyone out there have an amazing Halloween costume in the works?

LindsaySignature


A monster of a project

I think it’s a given that anyone who sews will eventually make a Halloween costume. It was only a matter of time after I bought my sewing machine in July that I started racking my brain for Halloween costume ideas.

Since I planned to attend Mickey’s Not-So-Scary Halloween Party with a friend at Disney’s Magic Kingdom Park, we really wanted to come up with a fun Disney pair that was slightly outside-the-box. A prince-and-princess just seemed too cliche for our creative personalities. After coming up with a lot of ideas, we finally decided that Mike Wazowski and Boo from the Disney-Pixar film Monsters, Inc. was the winning duo.

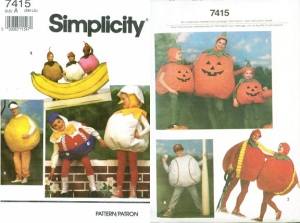
I started with Simplicity 7415,  a vintage pumpkin / tennis ball / baseball / ice cream scoop / pincushion / Humpty Dumpty pattern from the early 90’s. (Side note: I’m happy to report that this is the first official pattern I’ve mastered thus far. Woohoo!)


I followed the instructions for the tennis ball costume, primarily using lime green broadcloth for the body, and lined the inside with felt to add a little shape. I used white, black and kelly green broadcloth to create the eye, which is glued on and lightly handstitched around the edges. We stuffed the costume with crumpled newspapers contained in trash bags, and elastic at the neckline and the bottom of the costume kept the innerds from falling out during our trek around the Magic Kingdom.

In a dream world, I would have sewn a shirt and pants for Mike Wazowski using the same lime green broadcloth as the body – but in the end, it was just more practical to wear a pair of mint green scrubs that he already owned. My entire Boo ensemble consisted of lucky finds at Walmart – no sewing involved.

Mike Wazowski and Boo costumes

Can you believe I was lucky enough to attend the Halloween party with Nick Lachey?

Although only die-hard Disney fans recognized me as Boo, the Mike Wazowski costume was a HUGE HIT. I couldn’t believe how many “Mike Wazowski!!!” shouts we heard from afar. Little Monsters Inc. fans in strollers gazed up at Mike Wazowski with wide eyes. My friend was quick to brag about my skills to strangers, telling them that I had sewed the costume, but I was secretly glad it was dark outside so that nobody could see my imperfect stitches up close!

What I learned from this project:

  • To fulfill a creative vision, it’s sometimes necessary to shop for out-of-print patterns on the internet.
  • I used bias tape for the first time. I still can’t say I completely understand the purpose of fabric “cut on the bias,” but for the purpose of this project, it was incredibly useful to have long strips of pre-cut, folded fabric.
  • This costume was the biggest and most cumbersome project I have made to date. It was also the most time consuming, and let’s face it, a lot of the steps were repetitive and not very exciting (sew lots of solid colored panels together… zzzzzzzz). Feeling burnt out from a specific, monotonous project is probably normal. But it sure helped my sewing soul to take some days off to work on other projects, like cutting fabric for new Friendship Bags, before returning to the Halloween costume.

All in all, I love how the Mike Wazowski costume turned out, although it is a little strange to have a monster hanging in my closet!

What are you dressing up as for Halloween this year?

LindsaySignature