Disney-Inspired Halloween Costume Round-Up

A few years ago, I posted a roundup of Halloween costumes from my past, but it’s been awhile since I last talked about costumes. As we head into the 2018 Halloween season, here’s a mini-roundup of some Disney-inspired costumes that I’ve crafted in recent years for Mickey’s Not-So-Scary Halloween Party at Magic Kingdom Park!

2015: Wilderness Explorer (from the Disney-Pixar film Up)

I’d been wanting to run with this costume idea for some years when I finally decided to go for it. It seemed fairly simple to pull off and I loved all of the small crafty details that went along with it.

IMG_1259

  • Khaki Shorts: I already owned these!
  • Shoes: I didn’t have hiking books, but I already owned these brown Sketchers. I added orange laces.
  • Hat: The cheapest solid-yellow version I could find in an eBay store.
  • T-shirt: Plain, solid-yellow from a craft store.
  • Wilderness explorer logos and flag: Crafted from felt and glue, using an image I found on the internet as a template. Flag also required a wooden dowel and bead.
  • Sash: Sewn from solid brown broadcloth. I freehanded a pattern on paper using my real-life Brownie Girl Scouts sash as a guide (LOL).
  • Neckerchief: Solid orange broadcloth, I sewed the edges just to finish it off, and then used a wooden napkin ring (craft store) to secure it.
  • Badges: I printed images from the internet, cut them out and decoupaged them to small wooden discs. I used hot glue to secure the badges to the sash.
  • Weird Wilderness Explorer pin with beads: I don’t really know what this thing is, but I crafted it using a small square mirror painted brown, and some wooden craft beads, then taped a safety pin to the back.
  • Grape Soda pin: A Disney Parks merchandise purchase.

I had a lot of fun crafting this one, and it was a really comfortable costume, which is important when you’re wearing it to a theme park! The sash with badges did tend to sag a bit from the weight of the badges, so I had to keep adjusting it throughout the night, and the sewing badge fell off within five minutes of me arriving at the party (it HAD to be the sewing badge, right!?) – but other than those small challenges, I’d consider this costume a win!

2016: Fix-It Felix (from the Disney film Wreck It Ralph

This is another costume I’d had in mind for a few years, but I held back, thinking that it was better served as a group costume, and I didn’t know anyone who was willing to be my Ralph or Vanellope. But I finally decided I didn’t want to wait around for someone to be part of my group, and I moved full speed ahead with my dreams of being Fix-It Felix.

IMG_1260

  • Navy Shorts: I already owned these! I would have worn jeans if it had been cold outside.
  • Shirt: Purchased from the boys section at Walmart. I ordered an iron-on patch with my name from Etsy.
  • Hat: I already owned this hat, but created a “Fix-It Felix” logo from felt and lightly basted it over the existing logo on the hat.
  • Belt: A stretchy fashion belt from Walmart. I folded it and sewed a straight line from top to bottom to form a “loop” on one hip to store my gold hammer.
  • Hammer: I found a plain wooden hammer toy on Etsy, then spray painted it gold.
  • Shoes: I struggled with the shoes for this costume because I knew they were a distinctive part of Felix’s overall look, but real work boots are expensive. I really didn’t want to get expensive shoes just for a Halloween costume. I ended up finding these shoes in the boys department at Walmart, which give the appearance of work boots without being so expensive (since they’re squishy and don’t actually have steel in the toe). And although wearing kids’ shoes would normally be a stretch, they were super roomy inside and fit me just fine because of the style. Yay!

I’m so glad I decided to move forward with my Fix-It Felix dreams, even without anyone to be my Wreck It Ralph sidekick(s). One unexpected highlight of the night was running into other Ralph/Felix/Vanellopes throughout the park. They were more than willing to take a photo with me to complete my look!

2017: Mary Poppins 

My Mary Poppins inspiration started with a black skirt that I already own and regularly wear to work. A good black skirt seemed like one of the more important staples for a Mary Poppins costume, based on some Pinterest ideas I’d seen, so I decided to run with it.

image9

  • Blouse: Purchased from Amazon after searching for various options like “victorian blouse” and “lacy blouse.” I chose this one because it was sleeveless, which is perfect for a Florida Halloween party.
  • Belt: Not actually a belt, but just a red ribbon from my craft room that gives the appearance of a belt.
  • Hat: A black straw hat from Amazon. I accessorized it by using hot glue to attach some flowers I already had in my craft room, leftover from a wreath project.
  • Bow tie: I sewed this using solid red broadcloth I already had in my fabric collection.
  • Carpet bag: A super lucky find at Goodwill for just $2!
  • Parrot head umbrella: The craftiest part of my costume! I really wasn’t sure how I would approach the making of this umbrella, but I love the way it turned out. I molded a parrot out of Crayola Model Magic clay (that stuff is SO fun and SO amazing!) onto the handle of a cheap, black umbrella from Walmart. I used some of my craft paints to paint the parrot, and sealed it with a clear sealing spray. The Crayola Model Magic was the GREATEST decision since it was so versatile and most importantly, lightweight. I can see why the Cosplay community loves it so much.

So there you have it – the last three year’s worth of Halloween costumes. You’re probably wondering what I have up my sleeve for 2018. Keep an eye on my Instagram account for a reveal in just a few weeks!

Happy (almost) Halloween!
img_0981


Hippy-Dippy Birthday

Hey y’all – today is my birthday!

Celebrating my first birthday with a Hostess cupcake... back in the day before "smash cakes" were a thing.

Celebrating my first birthday with a Hostess cupcake… back in the day before “smash cakes” were a thing.

Today’s (self-serving) blog post is all about meeeeeeeeee! And more specifically, my personality as determined by my birth date and Disney character pairing, outlined in the book Disneystrology — which “combines astrology, numerology and the magic of movies to help readers understand their own personalities.” I was introduced to the book and this concept some years ago in a team building event at work where we all learned which Disney character was matched up with our birth date, and therefore, was supposed to be a reflection of our personality.

<i>Disneystrology</i> by Lisa Finander

Disneystrology by Lisa Finander

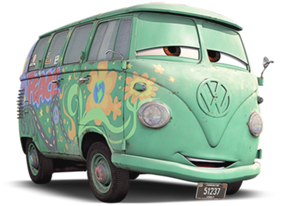
I had to laugh when I was told my birthday, February 7, had been paired with Fillmore – the hippy-dippy Volkswagen bus from the movie Cars. My first reaction was, “Ummmmm what?” I mean, there are definitely more awkward characters out there to be associated with (Stinky Pete? Did anyone out there actually get paired with him? LOL…) but I failed to see the connection to this one at a glance.

282px-Fillmore

Then I read the description for Fillmore a little closer, and the connection actually makes a lot of sense give my love of creativity and crazy ideas. Since then, I’ve been emotionally attached to this hippy-dippy bus!

Continue reading

#SewMyStash2015: Bag Challenge

In the spirit of #SewMyStash2015 (the latest challenge is to sew a bag consisting of 75% stash fabrics) — here’s my latest, magical addition!

I made a second rendition of the Zip and Go bag I made for my mom using the wonderful pattern from Dog Under My Desk – only, this time, I went the “selfish sewing” route and made it for myself. With all the time I spend perusing Disney parks, I was determined to make a a Zip and Go theme park bag for myself.

purse1

My new bag’s Disney theme park debut!

Where did that magical fabric come from, you ask? Um. Well. It used to be a pair of boxer shorts! How’s that for upcycling?

Continue reading

How to build a (magical) wreath

It’s Christmastime, which means I can’t talk about any of my sewing projects because they’re all a secret. But even though I have to keep my projects under wraps until the holidays are over, I still have a fun Christmas craft to share!

One of my favorite Christmas decorations to pull out of storage each year is the Mickey wreath I crafted over five years ago. Come December, I swear I have more interaction with my neighbors than I do all year long… all because they are asking about the wreath!

Mickey Mouse Wreath Tutorial on SewLindsaySew.com

Last year, I decided to replace the lights on the wreath with twinkle lights – turned out they were the “cool white” lights and are a little more blinding than I had anticipated. I’m pretty sure planes have thought about landing on my house. But I love the twinkle!

IMG_8168

Here’s a quick little guide for how to make your own Mickey wreath! Continue reading

DIY Halloween Costume: Remy from Ratatouille

October is a great month for lots of reasons, but one reason I really love October is that it’s Halloween costume season! I have great memories of flipping through the pattern catalogs in the fabric store and looking at all of the costume options throughout my youth. I don’t dress up every year, but I really enjoy pulling costume ideas together whenever I do.

The great thing about living in Central Florida is there’s always a Halloween party in town, given the number of Halloween themed events in the surrounding theme parks. Over the years, I’ve had a bunch of magical Halloween costumes:  Wendy Darling from Peter Pan, Boo from Monsters, Inc, a Mouseketeer and Tinker Bell. But one of the most fun costumes I put together was Remy from the movie Ratatouille!

The Ratatouille costume was a lot of fun and incredibly simple to put together at the last minute. It also forced me to learn how to spell “Ratatouille” from all the Googling I did while putting the costume together. 😉

Here’s a breakdown of my quick and easy DIY Remy if you’re looking for a last-minute costume!Remy

What you need:

  • Gray clothing items of your choice
  • Pink shoes
  • Pink gloves
  • Pink craft foam cut into a teardrop shape + chef’s hat (I used hair clips to secure the ears to the hat)

Optional:

  • Eiffel Tower on a Stick – print on computer paper, glue to poster board and attach a ruler or wooden dowel to the back. Instant Eiffel Tower on a Stick! I have to say — this was the most fun part of the costume. It made a great photo prop.
  • Recipe cards with a recipe for Ratatouille printed on them — these were fun to hand out to anyone who recognized us.
  • Linguini: No, not the pasta, the gangly chef from the movie! Find a friend who is willing to complete your Pixar duo, throw in some red hairspray, a chef’s hat and chef’s jacket (we got ours from eBay) and you’ve got yourself a Linguini.
  • A replica of the cookbook, “Anyone Can Cook!” I recreated one using a paper mache book from Joann Fabrics, craft paint and some graphics I printed from the internet. The book/box was a great place to store the recipe cards.
Anyone Can Cook

The cookbook from the movie alongside my paper mache version!

So there you have it… DIY Remy and Linguini!

Remy & Linguine Ratatouille costumes

My Linguini looks a lot like Nick Lachey.

What’s on your costume agenda this year? I’d love to hear your quick and easy DIY ideas!

Fun Fact… today they were serving ratatouille in my company cafeteria. I wrote this blog post some time ago, but had scheduled it to post today. And then… ratatouille for lunch. I wish I had taken a photo. I can’t make this stuff up. It’s magic!

LindsaySignature


Ninety-Nine!

Guess what? This is my 99th blog post, with my 100th just around the corner! It’s taken me a pretty long time to get here, considering my first post was on October 19, 2010. But my last-minute decision to go to grad school in 2011 meant my blog took a really, really long break and I’ve recently hopped back on the sewing train. Celebrate!

In my next post, I’m going to announce a cool new idea I have up my sleeve in honor of the 100th post. But for number ninety-nine, I thought it would be fun to dig into the archives and highlight some of my previous projects – including some that were never even mentioned in my blog. This is just as exciting as getting the DVD and watching the extra scenes that were cut out of the movie, right!?

Continue reading

The force is strong with this one!

Whenever I come across licensed character fabric in the remnant bin, I feel compelled to buy it. Licensed fabric is expensive, and remnants are a great opportunity to get the fabric for 50-75% off, depending on the sale. So that’s exactly what happened a few days ago when I came across some Star Wars fabric in the bin. I’m not really a Star Wars fan, but I have plenty of friends who are. And my association with Disney in recent years has made me familiar enough with the franchise that I knew I could put it to good use.

When I got home and added the purchase to the ABYSS I call my fabric bin, I felt guilty for being such a fabric hoarder. I definitely buy more fabric than I use. I’ve been pretty good about avoiding fabric purchases for some time now, but like I said, I have this thing about licensed fabric. So I decided I needed to immediately start using up some fabric for something — anything. Starting with Star Wars.

The Star Wars print, which was supposed to look like a bunch of comic book covers, had a rectangular shape on it that looked almost exactly the size of the zipper pouches I like to make. So I had to try it.

image_5

Continue reading

Ode to Joe (and what I sewed)

When I moved to Florida in 2006, one of the first people I met was Joe. We both participated in the Disney College Program together and spent many, many hours living it up in the Disney parks!

Joe

Some photos from our College Program days back in 2006!

After the Disney College Program ended, I stayed in Florida – and Joe returned home to New York. But within a year or so, he was back in Florida and we’ve been able to continue our adventures ever since!

Continue reading

A magic-filled weekend

This past weekend, the Disney Parks Blog posted this awesome video showcasing how the outfits are created for the little dolls in the ‘it’s a small world‘ attraction…

How incredible is that? I loved seeing the huge binder full of reference photos and the drawer of bling. I want a drawer of bling! Right now I just have a Tupperware of buttons. And most of them are un-fun buttons that come attached to the tag of a new shirt. So… not nearly as magical as the drawer of bling.

Continue reading