Sunny Summer Sewing Projects: Tutorial Roundup

It’s summer! And unlike most people, I love summers here in Florida. I love spending scorching sunny days poolside with a good book and a LOT of sunblock! Lucky for me, the Florida summer lasts about six months instead of the standard three, so I don’t feel guilty spending some time inside crafting even when the sun is shining. 🙂

Of course, I plan on keeping my project list bright and summery. No plans for heavy quilts or winter projects! Check out some of these FREE (!!!) tutorials I’ve recently added to my summer project inspiration list.

Summer Sewing: Free Project Tutorial Roundup

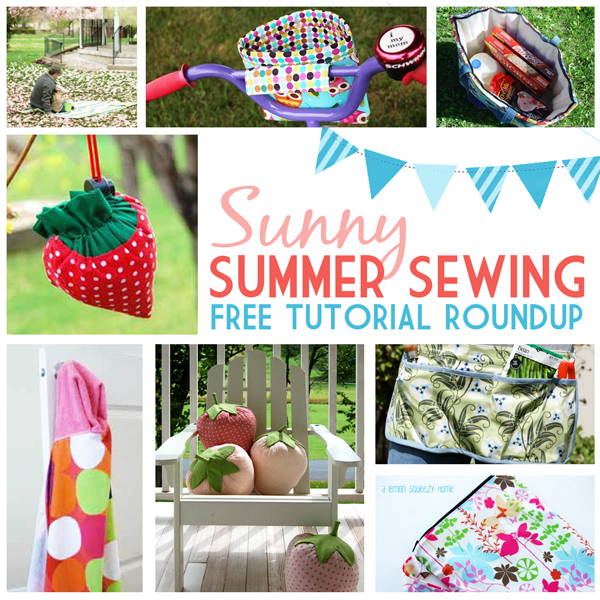
This adorable strawberry bag folds up into a tiny take-along strawberry when you’re not using it. Hello, Farmer’s Market! Click here for the free strawberry bag tutorial at ikatbag!

Strawberry Bag Sewing Project

Photos & tutorial courtesy of http://www.ikatbag.com

What’s a day at the pool without a hooded towel? And these aren’t just for kids — I’m 27 and may or may not have hooded towels with Mickey ears folded up in my bathroom closet. Click here for the free hooded towel tutorial at Obsessively Stitching!

Hooded Towel Sewing Project

Photo and tutorial courtesy of obsessivelystitching.blogspot.com

Although these are usually advertised for carrying cloth diapers, wet bags are perfect for carrying damp swimsuits! Click here for the free wet bag tutorial at A Lemon Squeezy.

Wet Bag Sewing Tutorial

Photo and tutorial courtesy of alemonsqueezyhome.blogspot.com

This insulated picnic tote is perfect for keeping groceries cold on a sweltering summertime car ride home. I desperately need one of these! Click here for the free insulated tote tutorial at Punkin Patterns.

Insulted Tote Sewing Tutorial

Photo and tutorial courtesy of punkinpattern.blogspot.com

Check out this quaint little bike bag for that special cyclist in your life. Click here for a free bike bag tutorial from noodlehead. 

Bike Bag Sewing Tutorial

Photo and tutorial courtesy of noodle-head.com

Any picnic blanket is a nice-to-have item – but a tote bag picnic blanket is a must-have! Click here for a free picnic blanket tote tutorial at Craft Buds.

Picnic tote sewing tutorial

Photos and tutorial courtesy of CraftBuds.com

This garden apron is so cute that I don’t think I could bear to get it dirty! Click here for a free garden apron tutorial at Make it Do. 

Garden apron sewing tutorial

Photo and tutorial courtesy of make-it-do.com

Just look at these giant strawberry pillows. Honestly. Have you ever seen anything more magical? I’m in awe. I just love these. Click here for the free strawberry pillow sewing tutorial from The Purl Bee. 

Strawberry pillow sewing tutorial

Photo and tutorial courtesy of purlbee.com

Believe it or not, these projects are just the tip of the iceberg. I found tons of inspirational summer sewing tutorials out floating around the internet – it was really hard to narrow down my favorites!

What’s on your craft list this summer?

LindsaySignature

On a (crayon) roll!

Google the phrase “crayon roll” and you’ll be inundated with images, tutorials and etsy shops featuring this gem that allows kiddos to tuck crayons into little pockets, roll ’em all up and take ’em on the go. As someone who is constantly on the hunt for free sewing tutorials, it finally got to the point where I just HAD to try making one of these little guys. They’re famous in the online sewing world!

Crayon Roll

As luck would have it, my friend Brie was about to celebrate a birthday – and Brie LOVES crayons. It should be noted that Brie is an adult, but if you are an adult who does no longer finds joy in a set of brand new crayons, you’re clearly not living your life to the fullest.

So I set out to find the most ideal crayon roll tutorial and settled on The Pleated Poppy – a blog tutorial featuring super-clear instructions and stunning photos.  I whipped up my first crayon roll in just an hour or so, impressing even myself – new projects never have such a quick turnaround! There were some slight mish-moshy stitching errors here and there, but overall, the project was a winner!

Crayon Roll

Notes about this project:

  • It uses very little fabric! I was able to use some scraps leftover from my Friendship Bag and my nook cover  for Brie’s crayon roll.
  • The tutorial linked above uses an elastic and a button to secure the roll closed, but I opted for ribbon ties instead.
  • Precise measurements are crucial for both the fabric pieces and the seam allowances. If the seam allowance is too big, the crayon pockets on either end of the roll will be too small. I learned this the hard way!

Since then, I’ve felt inspired to whip up a handful of crayon rolls, assembly-line style, for all of the kiddos in my life. Messy crayon buckets be gone!

The Friday Five: 5 steps to a no-sew wreath

This week’s Friday Five is both a list AND a tutorial wrapped up into one post! Wahoo!

When I was little, I remember my beloved Aunt Corlyne (who was always bursting with enthusiasm about the latest and greatest craft trends) bringing over bags of supplies to make these easy fabric wreaths. This no-sew craft gives everybody an excuse to shop in the fabric aisle, regardless of whether they know how to sew or not. It is a fun project for kids who are old enough to be trusted with a pointy pencil, although grown-ups may have to take care of the pinking shears portion.

1. Gather: You’ll need…

  • A few yards of fabric in coordinating colors
  • A styrofoam wreath (usually available in the floral section of craft stores)
  • Pinking shears (a.k.a zig-zag scissors)
  • A pointy object such as a screwdriver, skewer, pencil, etc.

2. Cut: Use the pinking shears to cut out a pile of fabric squares. The exact size doesn’t matter and the shape can be rough, but the size should be approximately 3×3 inches.

Fabric Squares

I used a bunch of Valentine fabric leftover from a quilt my mom made me in college!

3. Stab: Wrap a fabric square around the pointy object, then stab the whole contraption anywhere on the styrofoam wreath. When you pull the pointy object out, the fabric should stay wedged in the styrofoam.

Pointy Object

Wrap the fabric around the object right-side-up.

4. Fill: Continue with step #3, filling in the entire front side of the wreath. You’ll probably find yourself having to revert back to step #2 and cut out more squares as the project progresses. It only took me one viewing of Eat, Pray, Love and one episode of How I Met Your Mother to complete my heart wreath from start to finish!

Keep going until the entire wreath looks like this!

5. Hang: Now that your wreath is complete, hang it from a nail or use thumbtacks to secure a ribbon on the back!

Heart Wreath

The Friendship Bag

In my first few weeks of sewing machine bliss, I was lucky enough to stumble across p.s. i quilt, an inspiring blog with lots of incredible tutorials. I was immediately drawn to the Friendship Bag tutorial. Not only was the bag adorable, but I read the instructions ahead of time and understood each and every step thanks to the wonderful photos included throughout the tutorial. Plus all of the fabric pieces were rectangles that I could easily measure and cut myself without having to print a pattern.

I eagerly chose a variety of “fat quarters” at the fabric store. I have since learned that “fat quarters” are a quarter of a yard of fabric… duh, makes sense. But that means they are not always the best deal at $1.99 apiece, as that would be about $8/yard on the bolt! A little pricey for a beginning sewer, prone to disaster, who is just experimenting with a new project. But alas, the fabrics I chose complimented each other perfectly, were very “Lindsay-ish” with their cutesy blend of browns and pastels, and therefore worth every penny.
I made the bag and was shocked at how tiny it was. But my euphoria about making a successful bag outweighed the fact that I hadn’t really paid attention to the measurements, which clearly indicated how small the bag would be. Since I had plenty of fabric left, I later recalculated the measurements and made a larger bag.
What I learned from this project:
  • There are lots of awesome, free tutorials available on the internet, thanks to savvy sewers on the web. Wahoo!
  • Pay attention to measurements in order to get an idea of how large or small the final product will be. Don’t assume!
  • “Fat Quarters” may look like a wee little economical choice in the store, but that is not necessarily the case. That doesn’t mean I’d ever pass up an adorable Fat Quarter, but I’ll never pass up an adorable fabric on the bolt out of convenience, either.

And now, I will leave you with the measurements for the larger bag. Follow steps in the p.s. i quilt tutorial, with a 1/4″ seam allowance.

  • 16 strips, 9.5″ x 2.5″
  • 1 bottom panel, 17.5″ x 9.5″
  • 1 lining, 16.75″ x 25″
  • 2 straps, 24″ x 4″

Happy sewing!

LindsaySignature